Note: By unlocking Bootloader you will lose warranty of your phone.
Disclaimer: Treat this post as a guide, since the post is not responsible if anything goes wrong.
This post will explain how one can unlock bootloader and install TWRP Recovery image in Lenovo Z2 Plus. This post also explain how to install custom ROMs, specifically Viper OS or AICP in the device. Both the custom ROMs support VoLTE. At the time of writing this post, the Android Version of both ROMs is 7.1.2 (Nougat).
Prerequisite:
Summary of files needed to install custom ROM:
- Platform Tools: ADB and Fastboot.
- TWRP image
- unlock_bootloader.img from developer.zuk.com
- Google apps
- Custom ROM
Let’s get the above list of files one by one.
Platform Tools:
You can either install full Android SDK (big file) from [1], if you are interested in android development, or just install platform tools (smaller files). You can get the platform tools from [2], [3], [4].
TWRP image for Lenovo Z2 Plus:
Team Win Recovery Project (TWRP) is an open-source software custom recovery image for Android-based devices. You can get the TWRP image for Lenovo Z2 Plus from [5].
Unlock bootloader image:
- Open link http://developer.zuk.com/bootloader [6] in chrome and use google translate to translate page to English.
- Select Model Z2 for Z2 plus.
- Enter 8 digit serial number of your phone, which you can get from Phone’s settings-> About -> Status -> Serial number.
- Provide your email id, check the check-boxes and submit.
- You will get an email in your email id from zuk.com (almost immediately, so check your spam folder in case it is not in the inbox).
- Download the unlock_bootloader.img (1KB file :p) in the attachment.
Download Google Apps:
- Open link http://opengapps.org/ [7].
- Select Platform: ARM64
- Select Android 7.1.
- Select Variant (say, micro).
Important Points for selecting correct Variant:
- Select appropriate variant in step 4 above, otherwise you will feel frustrated later with either a lot of google apps, or missing some default apps (replaced by google apps), which will be because of wrong google apps variant, and not because of custom ROM.
- Check comparison between different variants at [8].
- The comparison table at the above link, shows for each variant, what all google apps are included in it. So for example, Super variant has almost all the google apps, while Pico variant has the least number of google apps.
- Note that the entry O means this variant replaces the Stock/AOSP version of the application by default. For example, for Super & Stock variant, the entry for Google Contacts is O. This means that if you go with Super or Stock variant, this variant will replace the default Contacts app supplied by the custom ROM with the Google Contacts. Then you will only be able to store contacts in Google, and will not be able to store contacts in your device, since google contacts will not give you the option to store contacts in your device.
- I selected micro variant, as per my requirement (which is have only important google apps and have some default apps from custom ROM to be not replaced by google apps).
Download Custom ROM:
Following are the Custom ROM, I tested with Lenovo Z2 Plus:
- Viper OS: Download link – [10]
- AICP: Download link – [11].
You can check reviews of both the custom ROMs in forum.xda-developers.com [9] and/or youtube for look and feel. Few comments:
- Both support VoLTE (checked Reliance Jio, India)
- AICP has more stock like feeling, while Viper OS gives more customizations.
Summary of files downloaded till now:
You must have installed ADB & Fastboot. You should also have following files (put it in same location):
- unlock_bootloader.img
- TWRP image (like twrp-3.1.1-0-z2_plus.img)
- Open Google Apps (like open_gapps-arm64-7.1-micro-20170728.zip)
- Custom ROM (either Viper OS like Viper-z2_plus-7.1.2-Python-v2.1-20170702-OFFICIAL.zip, or AICP like aicp_z2_plus_n-12.1-NIGHTLY-20170728.zip)
Enable USB debugging in your phone & check ADB:
- Go to Phone’s settings-> About.
- Tap ZUI version 7 times to get Developer Options.
- Go to Phone’s settings -> Advanced Settings, there you will find Developer Options; enable USB debugging.
- Connect your phone with your PC, it will prompt to Allow USB debugging.
- Check “Always allow from this computer” option and proceed.
- Open command terminal, run the command: “adb devices”. It should list your device serial number and ‘device’ (not unauthorized).
Instructions:
There is a good video in youtube [12] which shows how to unlock bootloader, install TWRP and install Viper OS. I would suggest you to have a look to get the visuals of how the various screens will look at the time of whole process. Then follow the below steps:
Steps to unlock the bootloader & install TWRP:
- Open the command terminal .
- Run “sudo su” for root access (in linux OS). Reason fastboot needs root access.
- Go to the path having unlock_bootloader.img & twrp-3.1.1-0-z2_plus.img files.
- To check your device is accessible, run following command:
adb devices
- Run following command to reboot the device:
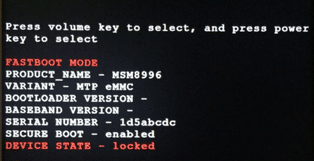
adb reboot bootloader
The above command will reboot the device and you will get fastboot mode screen as shown below. Note it will show the DEVICE STATE as locked.
- Test fastboot has access to your device (run command in your PC terminal):
fastboot -i 0x2b4c devices
The above command should list your device.
- Run below command:
fastboot -i 0x2b4c flash unlock unlock_bootloader.img
You should get the output like:
target reported max download size of 1610612736 bytes
sending ‘unlock’ (0 KB)…
OKAY [ 0.037s]
writing ‘unlock’…
OKAY [ 0.053s]
finished. total time: 0.090s
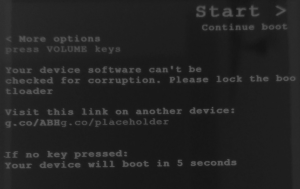
- Note that after running the command (shown below) the device will boot, and you will get a screen with ‘Start >’ text at top right corner as shown in image below. The screen will be there for 5 seconds. At that screen, press any volume key to open option’s menu. In the option’s menu, navigate up or down using volume up key or volume down key. Navigate to fastboot option, and press power key for selection. You will get the fastboot screen. The fastboot screen is required to run further fastboot commands.
Run the following command to unlock boot loader:
fastboot -i 0x2b4c oem unlock-go
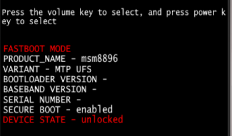
The above command will unlock the bootloader.
- If you have run the above command and also selected the fastboot option from option’s menu, you should get a screen similar to the screen shown in image below, but now it should show the DEVICE STATE as unlocked as shown below:
Run the following command to test that fastboot still has access to your device:
fastboot -i 0x2b4c devices
It should list your device.
- Run below command to flash TWRP recovery:
fastboot -i 0x2b4c flash recovery twrp-3.1.1-0-z2_plus.img
- Run below command to restart your phone in TWRP recovery mode:
fastboot -i 0x2b4c boot twrp-3.1.1-0-z2_plus.img
The above command will open TWRP Recovery mode.
- You have successfully installed TWRP Recovery Mode. Swip to allow modifications. This will list options like Install Wipe etc.
Summary of commands used:
adb devices
adb reboot bootloader
fastboot -i 0x2b4c devices
fastboot -i 0x2b4c flash unlock unlock_bootloader.img
fastboot -i 0x2b4c oem unlock-go
fastboot -i 0x2b4c devices
fastboot -i 0x2b4c flash recovery twrp-3.1.1-0-z2_plus.img
fastboot -i 0x2b4c boot twrp-3.1.1-0-z2_plus.img
Create backup of stock ROM:
Before installing custom ROM, it is advisable to create backup of the stock ROM present in the device. So in case something goes wrong, or you want to revert your phone back to stock ROM, you can use the backup. Following are the steps to create backup of stock ROM:
- In TWRP Recovery mode (which you get in last section), select Backup.
- Select options: Boot, Recovery, System, System Image, Data, Firmware
- Swip to backup.
- After completion, navigate back to TWRP Home Screen.
- In your PC, open the Internal storage of your phone, you will find TWRP folder. Copy the TWRP folder in your PC. You can use this folder later to recover the stock ROM, using Restore option in TWRP Recovery Mode.
Wipe internal storage:
- In TWRP, select Wipe; them Swipe to Factory Reset.
- Select back to go back to previous window, then select “Format Data”, type “yes” to continue.
- Select back, then back, then select “Advanced Wipe”.
- In Advanced Wipe window, check the options: Dalvik / ART Cache, cache, System, data, Internal Storage. In short select all except USB-OTG.
- Swipe to Wipe.
- Navigate back to TWRP Home Screen.
Install custom ROM:
Below are the steps to install Viper OS (i.e. Viper-z2_plus-7.1.2-Python-v2.1-20170702-OFFICIAL.zip). If instead of Viper OS you want to install AICP use file “aicp_z2_plus_n-12.1-NIGHTLY-20170728.zip” instead of “Viper-z2_plus-7.1.2-Python-v2.1-20170702-OFFICIAL.zip”. Following are the steps:
- Open Internal Storage of phone in PC, copy Google Apps file (open_gapps-arm64-7.1-micro-20170728.zip) and custom ROM file (Viper-z2_plus-7.1.2-Python-v2.1-20170702-OFFICIAL.zip).
- In the device in TWRP Mode, click Install, which will open new screen listing the 2 zip files copied in above step. Click custom ROM file (i.e. Viper-z2_plus-7.1.2-Python-v2.1-20170702-OFFICIAL.zip file, which will open a new screen.
- Click Add more Zips, which will open previous screen listing the 2 zip files. Select google apps file, i.e., open_gapps-arm64-7.1-micro-20170728.zip.
Now you have selected both the files.
- Swip to confirm flash.
This will take few minutes to install custom ROM, then google apps.
- Click “Reboot System”, then Click “Do not install”.
The phone will reboot, flash a screen for 5 seconds having that “Start >”, ignore that screen, then the phone will boot with the new custom ROM.
- Wait for few minutes (approx 5-10 minutes). If it stuck at boot logo, press power button to restart phone. This will reboot the phone. It will take approx 1-2 minutes at boot logo, and then must boot the new custom ROM.
Congratulations you have successfully installed custom ROM in your Lenovo Z2 Plus !!!
References:
- https://developer.android.com/studio/index.html
- http://rpmfind.net/linux/rpm2html/search.php?query=android-tools
- https://developer.android.com/studio/releases/platform-tools.html
- https://developer.android.com/studio/command-line/index.html
- https://eu.dl.twrp.me/z2_plus/twrp-3.1.1-0-z2_plus.img
- http://developer.zuk.com/bootloader
- http://opengapps.org/
- https://github.com/opengapps/opengapps/wiki/Package-Comparison
- https://forum.xda-developers.com/lenovo-zuk-z2
- https://download.viper-os.com/z2_plus/
- http://dwnld.aicp-rom.com/?device=z2_plus
- https://www.youtube.com/watch?v=OKlUc-oLJxA
